How to Post Pictures From Computer to Instagram

Instagram has quick become the go-to site for sharing photographs online. In addition to Facebook, that is. With over 400 million active month-to-month individuals, and 75 million people going to daily, there are more filter-enhanced creations compared to you can drink a stick at. Instagram is a phone application, though and also can be a bit difficult on a PC, despite having a main app currently readily available. It's not impossible, though. Right here we reveal you just how you can take part in the enjoyable through Windows instead of an apple iphone 7 or Samsung Galaxy S7.
How To Post Pictures From Computer To Instagram
The best ways to utilize Instagram on Windows: The internet user interface
Checking out the Instagram website as well as logging into your account (or developing one) offers you access to the internet version of the application. While you may expect this to permit you the very same capabilities as the mobile version, one crucial function is missing out on - you can't upload any photos.

When you're visited, the primary page will certainly reveal your picture feed equally as it would certainly on the application itself. Along the top of the web page you'll likewise see three symbols in the upper right edge. These are for Explore (discovering brand-new individuals to follow), Notifications (who liked your pictures), as well as Profile (all the pictures you have actually uploaded). Making use of these you can still delight in the various photos that have been shared, yet there is no chance to edit or contribute to your collections.
You could likewise now download a specialized Instagram Windows application from the Windows Shop, however you still will not have the ability to post any type of images without a touchscreen Windows laptop computer or tablet computer. Read on for a workaround.
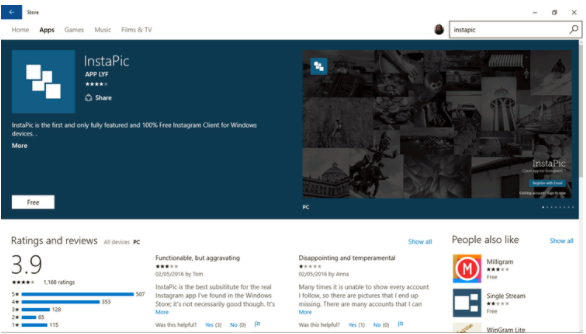
The best ways to upload photos to Instagram from a PC: InstaPic
There are a variety of 3rd party apps that prolong Instagram's attributes on Windows. One that enables uploads is InstaPic, which can be downloaded and install from the Windows Store. To do this decrease to the taskbar on your Windows desktop computer and also click the shopping bag icon that has the Windows logo design at the centre. When the Shop opens you'll simply have to click on the search bar in the upper right edge and also go into InstaPic. As soon as you have actually got the app on the screen click the Free switch to install it on your maker, after that click Open.
When the application launches you'll need to click the Register with Email switch and produce a brand-new account. Keeping that done you connect your Instagram account and then you could post photos straight from the InstaPic application. We encountered several problems with various other functions on the app, mainly not being able to see timelines as a result of the Find Friends on Instagram attribute proving less competent, plus commonly an absence of alerts. With this in mind we believe It would certainly be best to treat InstaPic as a pure image editor and uploader that works in tandem with the web version of Instagram.
Along the top of the screen you'll see the numerous icons for Search, Notifications/Likes, Profile, and Instagram Direct. This last one permits you to send out pictures independently to defined users. The one we intend to focus on however is the Shutter icon to the right of Instagram Direct. Clicking this opens up your COMPUTER camera.

From here you can click the blue circular switch to take a picture, or click the rectangular button to the left which opens up Windows Explorer and lets you search for any type of photo you carry your maker.
When you find the picture you wish to upload to Instagram double-click it to open up the editing and enhancing Window.

Now you can experience the regular processes of boosting the image. This includes cropping, using filters, as well as many of the editing features you 'd anticipate on the mobile variation of Instagram. We did find that the option of filters is fairly tiny, with a few of our favourites missing out on, but if you actually intend to utilize your COMPUTER to publish on the service after that this is currently the very best offering we might discover.
Once you've completed retouching the photo click the arrow in the top right-hand man corner and you'll see the Share menu appear. Equally as you would certainly on Instagram you can now create a subtitle, tag any kind of people in the picture, and also send to Facebook, Twitter, Tumblr, or Flickr if you've connected those accounts.

When you enjoy with everything click Share at the end of the home window and your image will certainly sign up with the masses on Instagram as well as hopefully obtain a couple of sorts.