How to Make A Private Facebook Page

How To Make A Private Facebook Page: Are you fretted about your privacy on Facebook? Intend to tweak your account personal privacy setups and also make your Facebook profile completely exclusive to non pals or perhaps to pals? Wish to limit them from viewing your Facebook individual information, friends list, picture cds, liked pages and every little thing you respect?
How To Make A Private Facebook Page
If so, in this message, I'll reveal you in in-depth steps how to transform your personal privacy setups in order to make every little thing private on facebook as well as stop people who are not your buddies from seeing anything.
Ready to take this trip? Prepared to secure your personal privacy on heaven site and also remove haters, stalkers as well as unwanted people? If so, let's go!
Action 1: Click the down arrowhead icon at the top right of any type of Facebook web page, then select "Setups" from the drop down food selection.

Action 2: From the left side, click on the "Personal privacy" tab.

Currently, you ought to be in your personal privacy setups web page. Are you there?
Action 3: Modification your default sharing:
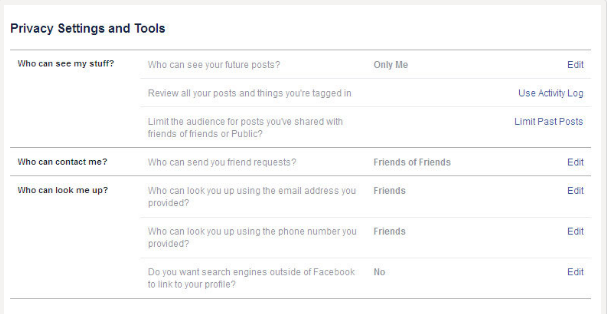
It's extremely important to pick that could see your future messages, so, whenever you post something it will be shared only with that said specific audience.
To do so, go to "That can see my things?", click "Edit" beside "Who can see your future blog posts?". Afterwards click the audience selector and choose the audience you want from the fall menu.
You can select "Buddies" to share your future articles only with your friends.
- You could likewise select "Custom" to establish them to a customized setups.
- Or you could choose "Just Me" to conceal your next posts from every person.
Tip 4: Limitation the target market for your old articles:
Want to limit access to your old published messages as well as share them only with close friends? If of course, you can utilize a terrific feature offered by Facebook called Limitation Past Posts.
So, what does this attribute do? In other words, It'll establish all your posts on your Facebook timeline to only pals by one click. Yet you need to understand that you will not be able to change them back in one click. You'll have to do that for every article separately.
Want to utilize this tool? Ready?
Click "Limitation Past Posts" link close to "Limit the audience for messages you've shared close friends of close friends or Public?", click "Restriction Old Posts" button" Click "Confirm"" Click "Close" in the popup home window" Then press the "Close" link.

Step 5: Protect against the public from sending you pal requests:
To stay clear of getting good friend requests from individuals you do not know, you'll should conceal the include close friend button from your Facebook profile.
To do this, Click "Edit" alongside "That can call me?"" Then click the audience selector as well as choose "Buddies of Pals" instead of "Every person"" Press "Close".

tep 6: Control who can look for you on Facebook utilizing the email address or contact number associated with your account.
Click "Edit" next to "That can look you up utilizing the e-mail address you supplied?", choose "Friends"" Press "Close".

Click "Edit" close to "Who can look you up making use of the contact number you given?", select "Friends"" Press the "Close" web link.

Step 7: Stop search engines from linking to your Facebook account:.
To do this, click "Edit" next to "Do you want internet search engine outside of Facebook to link to your account?", uncheck package beside "Permit online search engine beyond Facebook to link to your profile"" in the pop up home window, click "Switch off"" Press "Close".

After doing that, Facebook will certainly prevent search engines like Google Browse, Bing search, Yahoo search and also others from indexing your profile. Various other point is that people who are not logged right into Facebook won't be able to see your account in any way and this is the message they will see.

Tip 8: Now, let's transfer to an additional section, pick "Timeline as well as Tagging Settings" from the left side and also change the setups as explained listed below.
Tip 9: Stop friends from publishing on your own timeline:.
To do this, locate "Who can include points to my timeline?" and also click "Edit" close to "Who can upload on your timeline?", choose "Just Me" after that push the "Close" web link.

Also, click Edit beside Review posts good friends identify you in prior to they show up on your timeline?, pick Allowed and also press Close.

You could transform the rest of settings in this section, so the outcome must resemble this.

Step 10: Avoid non pals from following you:.
If you want making your Facebook exclusive, I don't believe it's essential to maintain the follow switch on your timeline. To conceal it, click on "Public Posts" in the left side, click the target market selector alongside "That Could Follow Me" and select "Buddies".

All just what we have done now is so so important, however actually we are just mosting likely to start with the big parts.
What concerning the good friends checklist, complying with as well as followers? Just what concerning the individual information equipped in the about section, such as contact number, email address, date of birth and so forth? Exactly what about your images and also image cds? What regarding your suched as web pages?
Step 11: Conceal your buddies list:.
Wish to limit some people or all them from understanding who your good friends are? Well, this web link will certainly show you how to make your pals exclusive on Facebook.
Step 12: Hide your individual information:.
to make your personal information exclusive, follow the steps described in this message: The best ways to Hide Your Personal Information on Facebook.
Tip 13: Make your photos and picture albums private:.
To avoid non buddies or pals from watching your personal images and photo cds, click this link to discover more about How you can Make Your Picture Albums Private on Facebook.
Action 14: Conceal your suched as pages:.
If you wish to keep the pages you like private on Facebook, take a look at this article: The best ways to Hide your Liked Pages on Facebook.
Ultimately, to earn sure that your Facebook account is totally personal, you'll need to view it as someone else. To do so, click the 3 dots symbol below your cover picture and also select Consider as ... Click here to read more to get more information about how to watch your Facebook account as someone else.
That's it for this blog post! If you still have any kind of inquiry concerning how you can make Facebook personal, you could publish it in the remark box listed below and also I'll aim to assist you as long as I can.