How to Make Facebook Fan Page Private

How To Make Facebook Fan Page Private: Are you stressed over your privacy on Facebook? Want to fine-tune your account privacy setups as well as make your Facebook profile totally personal to non pals or even to friends? Want to restrict them from watching your Facebook individual information, pals checklist, image albums, suched as pages as well as whatever you respect?
How To Make Facebook Fan Page Private
If so, in this blog post, I'll show you in thorough steps how to alter your privacy setups in order to make whatever exclusive on facebook and stop people who are not your buddies from seeing anything.
Ready to take this trip? All set to safeguard your very own privacy on the blue site and remove haters, stalkers and also unwanted individuals? If so, let's go!
Action 1: Click the down arrowhead symbol on top right of any type of Facebook web page, after that select "Settings" from the fall menu.

Action 2: From the left side, click on the "Personal privacy" tab.

Currently, you should remain in your privacy setups web page. Are you there?
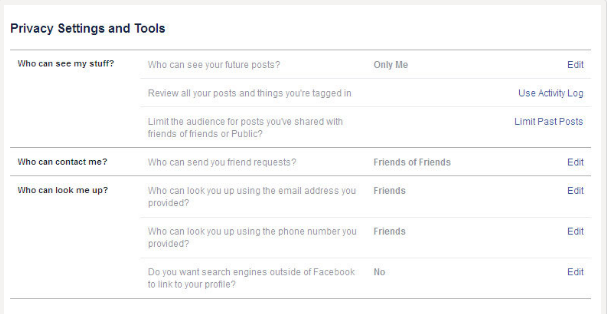
Step 3: Adjustment your default sharing:
It's extremely important to choose that can see your future messages, so, whenever you publish something it will certainly be shared just with that certain target market.
To do so, most likely to "Who can see my things?", click "Edit" close to "That can see your future messages?". Afterwards click the audience selector and also pick the target market you desire from the drop down menu.
You could pick "Pals" to share your future blog posts only with your buddies.
- You could additionally choose "Custom-made" to set them to a customized settings.
- Or you can choose "Only Me" to conceal your next messages from everybody.
Step 4: Limitation the audience for your old articles:
Wish to limit access to your old published blog posts as well as share them just with pals? If of course, you could utilize a terrific attribute given by Facebook called Limitation Past Posts.
So, just what does this attribute do? Basically, It'll establish all your articles on your Facebook timeline to only friends by one click. Yet you should recognize that you will not be able to revert them back in one click. You'll need to do that for each message separately.
Intend to utilize this tool? Ready?
Click "Restriction Past Posts" link beside "Limit the audience for posts you've shared pals of pals or Public?", click "Limitation Old Posts" button" Click "Confirm"" Click "Close" in the popup window" After that push the "Close" web link.

Step 5: Stop the general public from sending you buddy demands:
To avoid getting friend requests from individuals you do not know, you'll have to conceal the add friend button from your Facebook account.
To do this, Click "Edit" next to "That can call me?"" Then click the target market selector as well as pick "Friends of Pals" as opposed to "Everyone"" Press "Close".

tep 6: Control who can search for you on Facebook making use of the email address or phone number related to your account.
Click "Edit" alongside "That can look you up utilizing the e-mail address you provided?", select "Friends"" Press "Close".

Click "Edit" next to "Who can look you up using the phone number you provided?", choose "Buddies"" Press the "Close" web link.

Action 7: Stop search engines from linking to your Facebook profile:.
To do this, click "Edit" beside "Do you desire search engines outside of Facebook to link to your profile?", uncheck package beside "Allow internet search engine outside of Facebook to connect to your profile"" in the pop up window, click "Turn Off"" Press "Close".

After doing that, Facebook will certainly prevent search engines like Google Browse, Bing search, Yahoo search as well as others from indexing your profile. Various other point is that people that are not logged into Facebook will not have the ability to view your profile whatsoever and this is the message they will see.

Step 8: Now, let's transfer to an additional area, pick "Timeline and also Tagging Setups" from the left side and alter the setups as defined listed below.
Tip 9: Stop close friends from posting on your own timeline:.
To do this, situate "That can include things to my timeline?" and click "Edit" next to "Who can upload on your timeline?", select "Only Me" then push the "Close" link.

Likewise, click Edit next to Review blog posts buddies mark you in before they show up on your timeline?, pick Enabled and press Close.

You can transform the remainder of settings in this area, so the final result should resemble this.

Step 10: Stop non friends from following you:.
If you're willing making your Facebook private, I don't think it's needed to keep the comply with switch on your timeline. To hide it, click "Public Posts" in the left side, click the target market selector alongside "Who Could Follow Me" as well as select "Friends".

All exactly what we have done now is so so important, but actually we are simply mosting likely to begin with the big components.
What about the close friends list, adhering to and also fans? Just what concerning the individual details stocked in the around area, such as telephone number, e-mail address, date of birth and so forth? What about your images and also picture albums? Exactly what about your suched as pages?
Step 11: Conceal your good friends listing:.
Wish to restrict some people or all them from recognizing who your good friends are? Well, this link will reveal you the best ways to make your close friends private on Facebook.
Step 12: Conceal your personal info:.
making your individual info exclusive, comply with the actions defined in this message: The best ways to Hide Your Personal Information on Facebook.
Tip 13: Make your photos as well as image albums private:.
To stop non buddies or friends from watching your individual photos and also picture albums, click this link to find out more regarding How to Make Your Photo Albums Private on Facebook.
Action 14: Conceal your liked pages:.
If you intend to keep the pages you like personal on Facebook, take a look at this blog post: The best ways to Hide your Liked Pages on Facebook.
Finally, to earn certain that your Facebook account is entirely personal, you'll need to view it as somebody else. To do so, click the 3 dots symbol beneath your cover image and also pick Deem ... Visit this site to find out more to find out more regarding ways to watch your Facebook account as someone else.
That's it for this article! If you still have any type of concern concerning the best ways to make Facebook exclusive, you can publish it in the comment box below and I'll aim to assist you as long as I can.